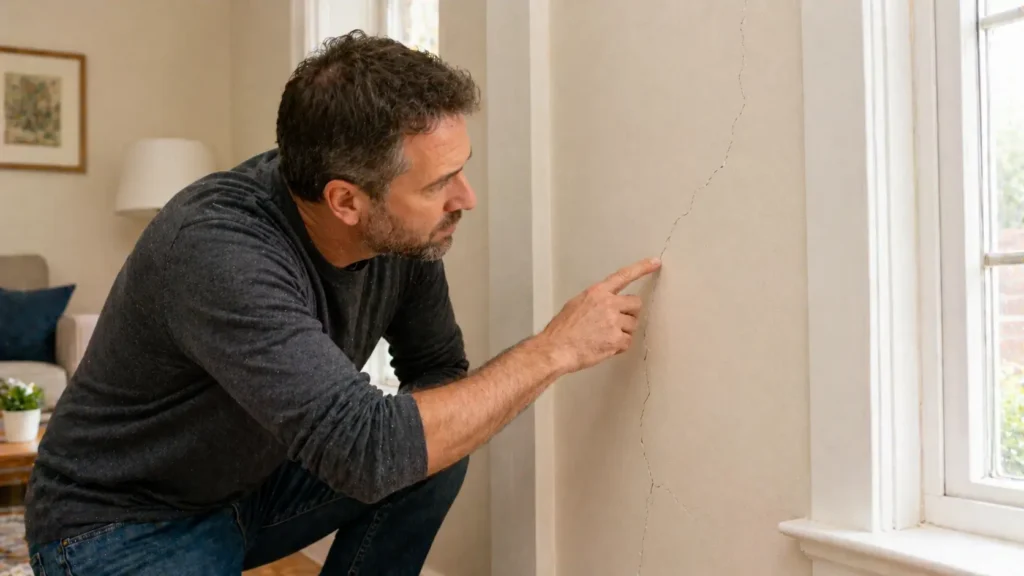
You walk into your living room, look up at the wall, and spot a thin line creeping across the plaster. Your heart sinks a little. Is it serious? Do you need to call a professional right now? Will it get worse?
Take a breath – chances are, it’s just a hairline crack. These tiny lines show up in almost every home at some point, and the good news is that most of them are completely harmless. Better still, you can fix them yourself without spending a lot of money or calling in an expert.
This guide walks you through everything you need to know – from understanding what hairline cracks are, to fixing them the right way so they don’t come back.
What Are Hairline Cracks in Plaster?
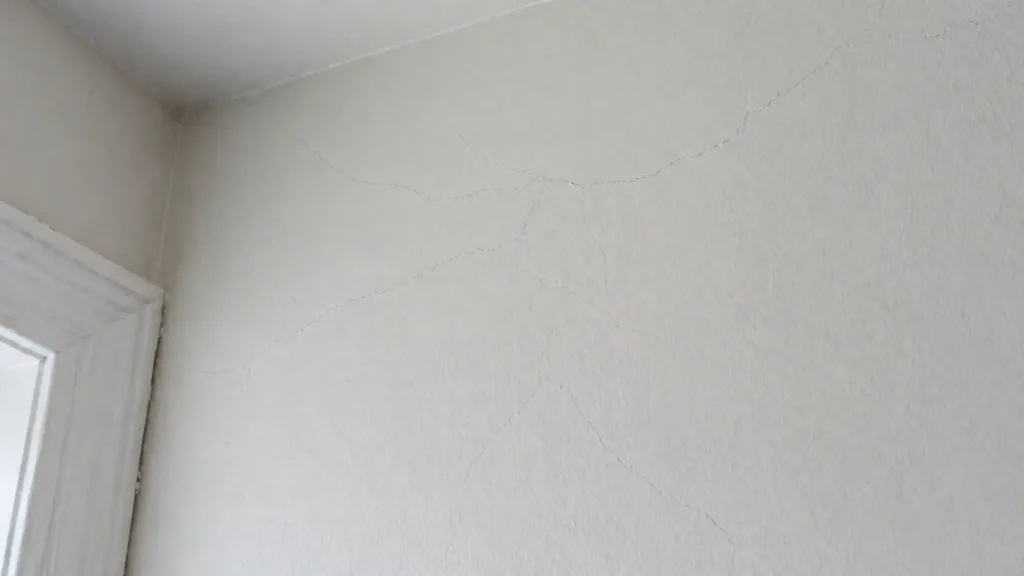
Hairline cracks are very thin lines that appear on plastered walls or ceilings. They are usually less than 1mm wide – about as thin as a strand of hair, as the name suggests. You often find them near door frames, at ceiling corners, or spread across a wall in a spider-web pattern.
These cracks are not the same as structural cracks. Structural cracks are wider, deeper, and usually appear in a diagonal or horizontal direction. Those need a professional to look at them. Hairline cracks, on the other hand, are mostly cosmetic. They do not affect the strength or safety of your home.
Why Do Hairline Cracks Appear?
Understanding the cause helps you fix the problem properly – and stop it from coming back. Here are the most common reasons hairline cracks form:
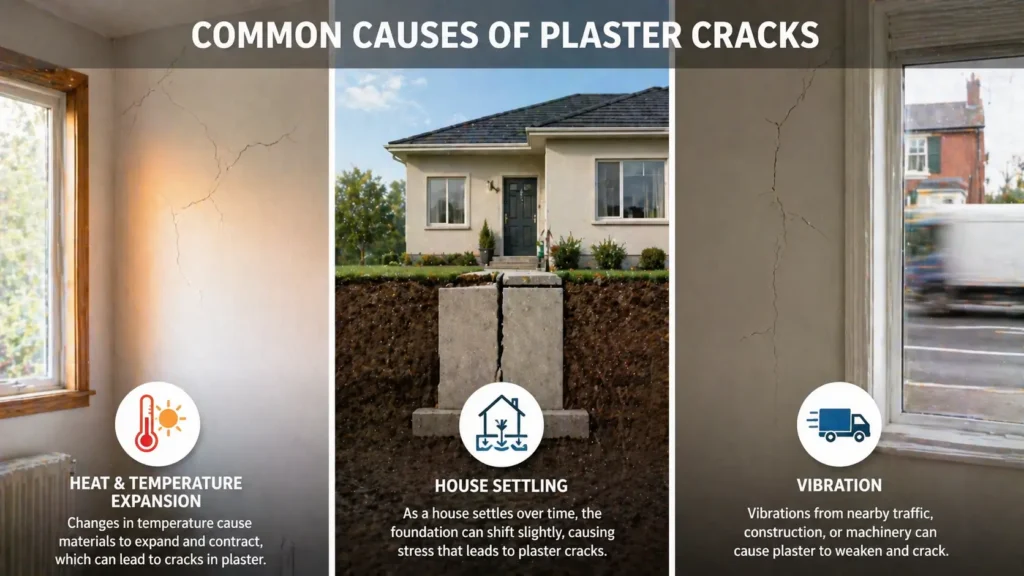
- Natural house movement. Every house moves slightly over time. As the building settles into its foundation, tiny shifts happen in the walls and ceilings. These shifts put pressure on the plaster, and eventually, a crack appears. This is very normal, especially in older homes.
- Temperature and humidity changes. Plaster expands when it gets warm and contracts when it cools down. This constant movement – especially in homes that heat up quickly in summer and cool down fast in winter – puts stress on the plaster surface and causes fine cracks to appear over time.
- New plaster drying out. If your walls were recently plastered, hairline cracks can appear as the plaster dries and slightly shrinks. This is completely normal. It does not mean the plastering job was done badly. Experts often suggest waiting a full year before filling these cracks, as more may appear while the plaster settles.
- Vibration from traffic or nearby construction. Homes located on busy roads or near building sites can develop hairline cracks from ongoing vibrations. The constant shake puts low-level stress on walls that adds up over time.
- Poor prep work before plastering. If the surface was not cleaned properly or old cracks were not treated before new plaster was applied, the new layer can follow the old crack patterns underneath.
Hairline Crack or Structural Crack? Here’s How to Tell
Before you pick up a filling knife, it’s important to make sure you’re actually dealing with a harmless hairline crack and not something more serious.
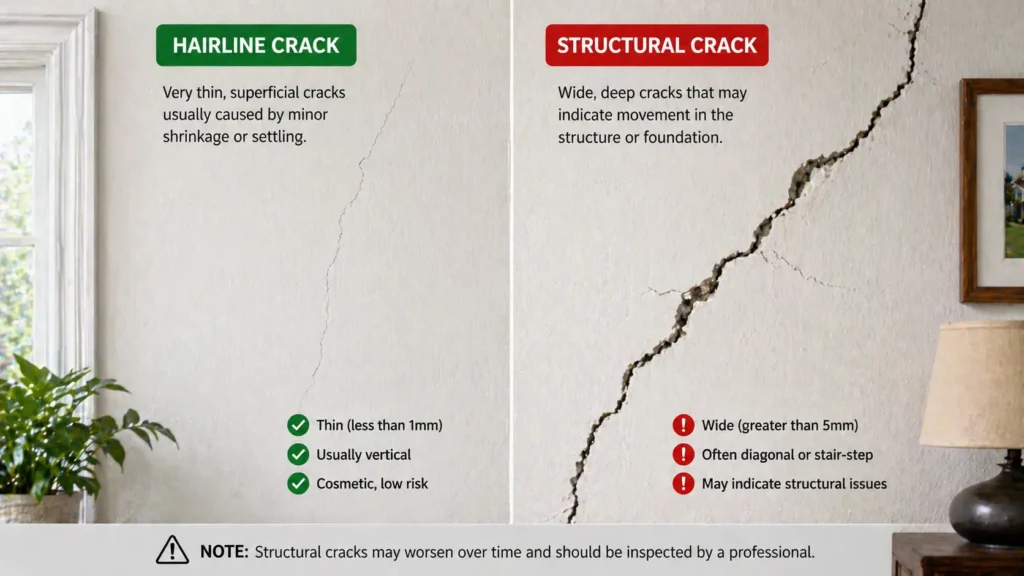
- Check the width. Run your fingernail across the crack. If it barely catches, it’s likely a hairline crack. Anything wider than 5mm needs professional attention.
- Look at the direction. Vertical cracks are usually harmless and just follow the natural movement of the wall. Diagonal cracks – especially ones that move in a staircase pattern – can signal structural movement. Horizontal cracks in walls are the most serious and should be checked by a structural engineer.
- Check the location. Cracks above door frames or around window openings are common and usually harmless. Cracks that appear at the corner where a new extension meets the original building need a closer look.
- Watch it over time. Use a pencil to mark the ends of the crack and write today’s date. Check it again in a week or two. If it grows in length or width, call a professional. If it stays the same, you can fix it yourself.
What You Need to Fix Hairline Cracks in Plaster
Gather these tools and materials before you start:
- Stanley knife or utility knife
- Flexible filler (in a tube, applied with a caulking gun)
- Caulking gun
- Fine surface filler
- Filling knife (also called a palette knife or scraper)
- Medium-grade sandpaper
- Damp microfibre cloth
- Primer
- Paint (to match your wall)
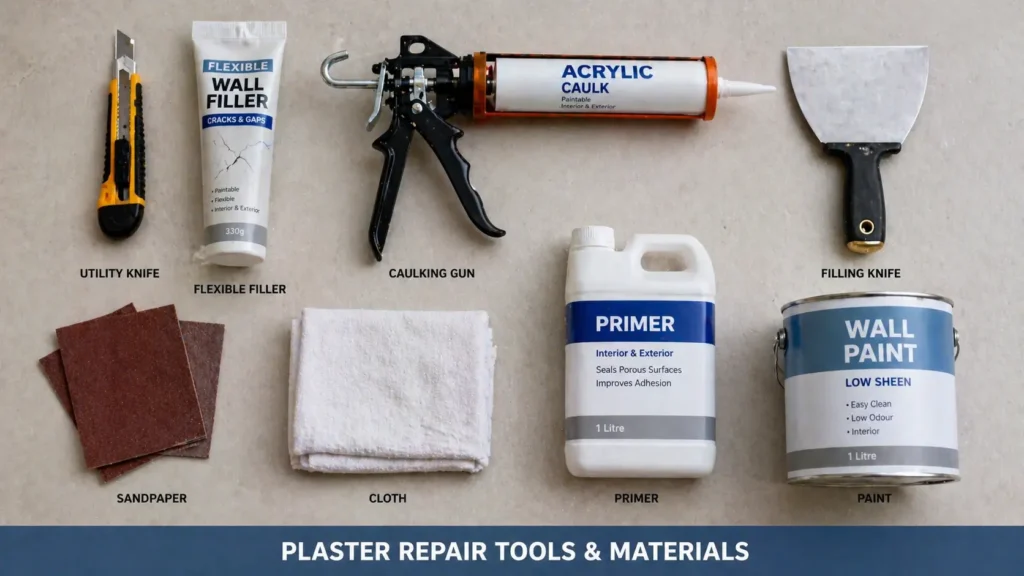
Having everything ready before you begin makes the job much smoother and faster.
How to Repair Hairline Cracks in Plaster Walls: Step-by-Step
Step 1: Inspect All the Cracks in the Room
Before you start filling, walk around the entire room and note every crack you can see. It is much more efficient to fix all the cracks at the same time rather than doing them one by one over several weekends. Look at walls, ceilings, and areas near doors and windows.
Step 2: Open Up the Crack (Don’t Skip This Step)
This is the step most people skip – and it’s the reason their repairs fail. Most people just push filler directly into the hairline crack as it is. The problem is that a hairline crack is far too thin for filler to stick properly. It comes back in days or weeks.
Instead, use a Stanley knife or utility knife to carefully widen and deepen the crack. Dig into the plaster a few millimetres wider and deeper than the original crack. Yes, it feels strange to make it bigger – but this is the right move. You are creating enough space for the filler to grip the plaster properly and flex with the wall over time.
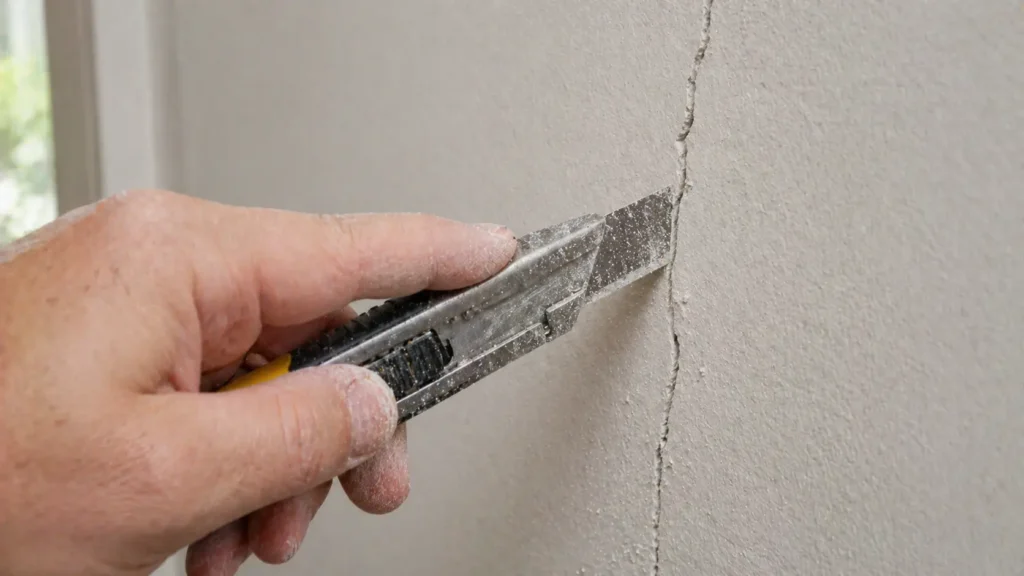
Once you are done cutting, use a brush or dry cloth to clear out any loose dust or debris from inside the crack.
Step 3: Apply Flexible Filler
Now fill the crack with a flexible filler. A flexible filler is key here – ordinary all-purpose filler is too rigid. When the wall moves (and it will), a rigid filler simply cracks again. A flexible filler moves with the wall and stays put.
Use a caulking gun to inject the flexible filler directly into the carved-out crack. Make sure the filler goes all the way into the space. Use a filling knife to smooth it down. Don’t worry too much about making it perfectly level at this stage – this is just your base layer.
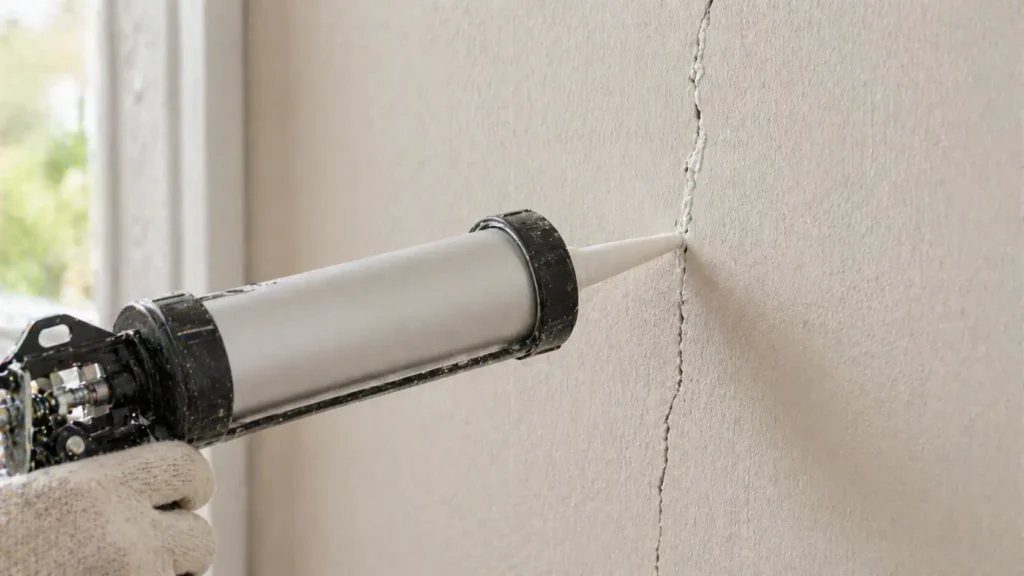
At [The Handy Home Pro], we always recommend using a flexible filler for plaster repairs because it dramatically reduces the chance of the crack coming back.
Step 4: Let It Dry and Sand It Down
Leave the flexible filler to dry completely. Check the packaging for the recommended drying time – it usually takes a few hours, but overnight is best. Once dry, use medium-grade sandpaper to lightly sand the area. You are not trying to scrub it down aggressively – just smooth off any raised bits and rough edges.
After sanding, wipe the area clean with a damp microfibre cloth. Let it dry fully before moving on.
Step 5: Apply Fine Surface Filler for a Seamless Finish
The flexible filler does the structural job of sealing the crack and flexing with the wall. But it does not give you a perfectly smooth, paint-ready surface on its own. That’s where a fine surface filler comes in.
Using your filling knife, spread a thin, even layer of fine surface filler over the repaired area. Feather the edges carefully so it blends into the surrounding wall with no hard edges or ridges. The goal is to make it look like the crack was never there.
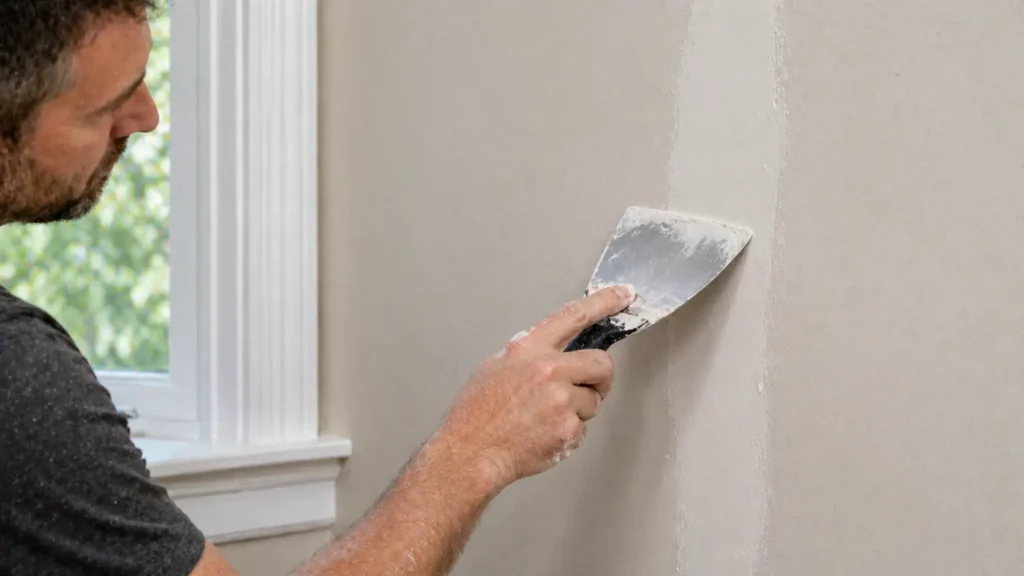
Let this layer dry fully, then give it a gentle sand with fine sandpaper until it is completely smooth and level with the rest of the wall.
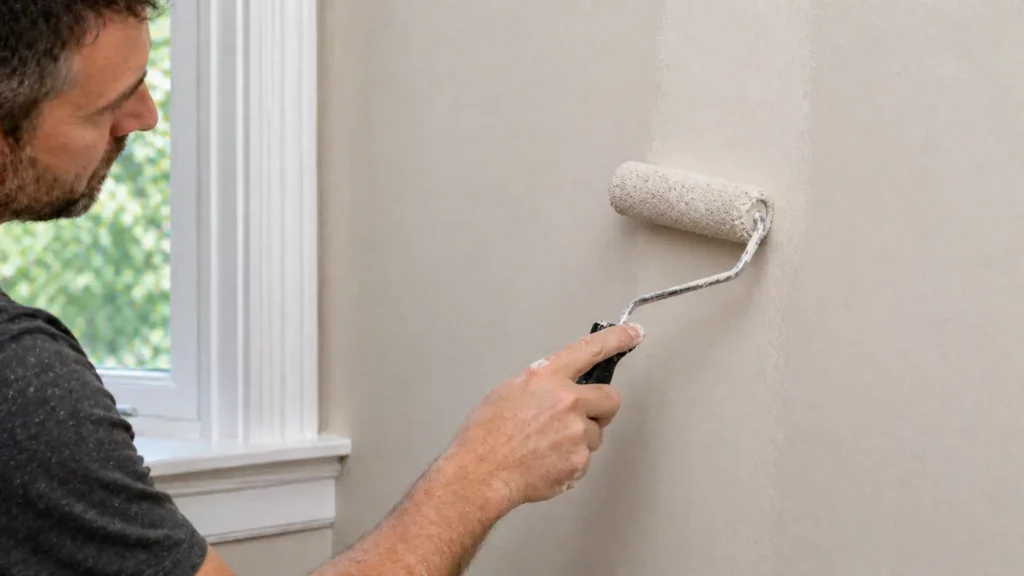
Step 6: Prime and Paint
Once the surface is smooth and dust-free, apply a coat of primer over the repaired area. Priming helps the paint bond properly and prevents the filler from soaking up the paint unevenly (which can leave a dull patch on your wall).
After the primer dries, paint over the area to match the rest of your wall. For the best finish, feather the paint outward from the repair rather than stopping sharply at the edge.
Tips to Prevent Hairline Cracks From Coming Back
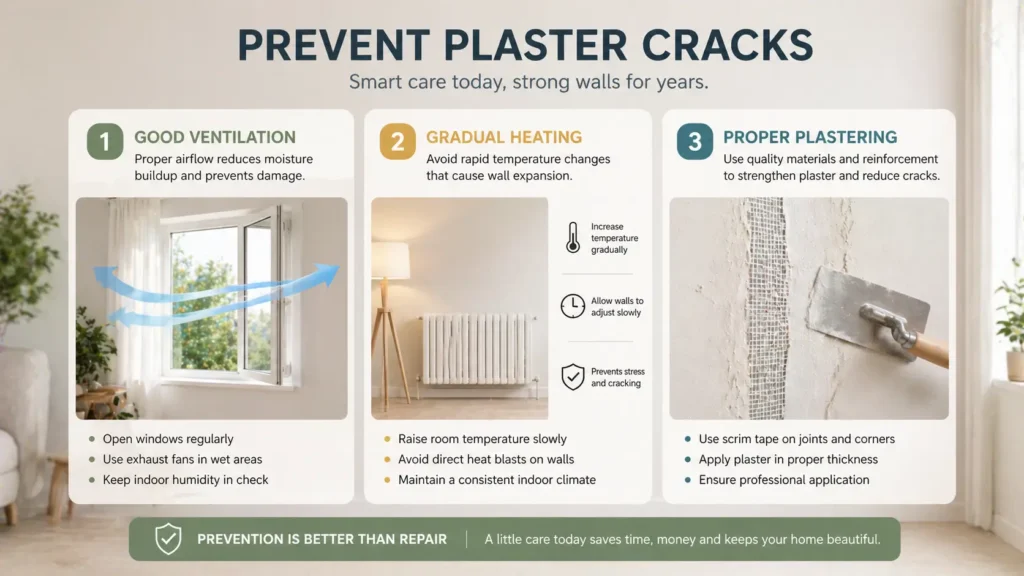
Fixing the crack is one thing – keeping it from returning is another. Here are some practical ways to reduce the chance of cracks reappearing:
- Control humidity in your home. Use extractor fans in bathrooms and kitchens. Make sure your home is well ventilated. Excess moisture causes plaster to expand and crack.
- Avoid heating your home too fast. Rapid changes in temperature put stress on walls. Gradual heating and cooling is gentler on plastered surfaces.
- Always use flexible filler, not standard filler, for hairline cracks. Standard fillers dry rigid and simply crack again when the wall moves. Flexible filler is designed to handle movement.
- Use scrim tape on future plastering jobs. If you ever re-plaster a wall, ask your plasterer to apply scrim tape over any existing cracks before the new plaster goes on. This reinforces the surface and helps prevent the old cracks from reappearing through the new plaster.
- Wait before filling cracks in newly plastered walls. If your plaster is fresh, give it at least a year to fully dry and settle before filling hairline cracks. Rushing the repair means you’ll likely need to do it again.
When to Call a Professional
Most hairline cracks in plaster are a DIY job. But there are situations where you should stop, step back, and call an expert:
- The crack is wider than 5mm
- The crack runs diagonally or horizontally across the wall
- The crack appears at the corner of a door or window frame and keeps growing
- You can see daylight through the crack
- Doors or windows nearby have started sticking or jamming
- You notice damp patches or mould near the crack
Any of these signs could point to a structural issue or subsidence. In these cases, a structural engineer or qualified surveyor can assess what’s really going on and recommend the right fix. Catching a structural problem early is far cheaper than letting it get worse.
Final Thoughts
Hairline cracks in plaster are one of the most common home maintenance issues – and one of the easiest to fix when you know what you’re doing. The key is not to rush. Take the time to widen the crack, use the right flexible filler, add a smooth top coat, and prime before painting. That extra care makes all the difference between a repair that lasts years and one that reappears a week later.
If you ever feel unsure about a crack – especially one that keeps growing or looks unusual – don’t hesitate to get a professional opinion. For everything else, [The Handy Home Pro] is your go-to resource for practical, no-nonsense home repair guides that help you get the job done right.
Happy fixing!
Frequently Asked Questions
Yes, they are very common. Almost every home develops hairline cracks at some point due to natural house movement, temperature changes, or plaster drying out. As long as they stay thin and do not grow, they are nothing to worry about.
A flexible filler is the best choice. Unlike standard filler, it stays elastic after drying. This means it can handle the natural movement of your wall without cracking again. For the top layer, use a fine surface filler to get a smooth, paint-ready finish.
You can, but it will show through the paint eventually. For a long-lasting fix, always widen the crack slightly, fill it with flexible filler, apply fine surface filler on top, and then paint.
Check the width (anything over 5mm is a concern), the direction (diagonal and horizontal cracks are more serious), and whether it is growing. If doors near the crack are sticking, or if you see damp or mould, call a professional.
Some do, some do not. It depends on the cause. If the crack is due to seasonal movement, it may grow slightly in winter and close in summer. If it keeps growing steadily in one direction, have it checked by a professional. Monitoring it with pencil marks over a few weeks is a good first step.
Absolutely. With the right tools and a bit of patience, fixing hairline cracks in plaster is a straightforward DIY job. The most important thing is to widen the crack before filling it and to use a flexible filler rather than standard all-purpose filler. Follow the steps in this guide and you’ll get a finish that lasts.