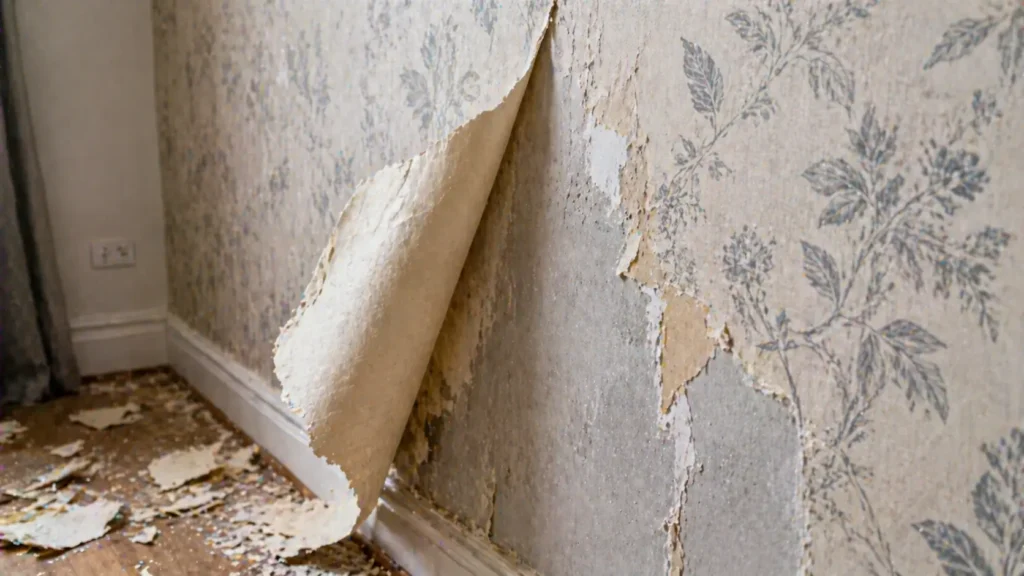
Are you staring at old, peeling wallpaper and wondering how to get it off without ruining your walls? You are not alone. Wallpaper removal is one of those DIY jobs that sounds simple – but can quickly become a messy, frustrating task if you go in unprepared.
The good news? With the right approach, the right tools, and a little patience, wallpaper removal is 100% doable on your own. This complete guide walks you through everything you need to know about the best way to strip wallpaper – from understanding what type you are dealing with to fixing your walls once the paper is gone.
Let’s get started.
What Is Wallpaper Removal (And Why It Matters in 2026)?
Wallpaper removal is the process of taking down old or unwanted wallpaper from your walls so you can repaint, re-wallpaper, or simply refresh the look of your room.
Sounds easy, right? Not always. Older wallpaper sticks like glue – sometimes literally – and if you rush the process or skip prep steps, you can end up with torn drywall, leftover glue residue, and a much bigger project on your hands.
Whether you are dealing with a single accent wall or an entire room full of dated floral prints, this guide gives you the full process, tested methods, and insider tips to make wallpaper removal as smooth as possible.
Tools and Supplies You Need Before You Start
Before you touch a single strip of wallpaper, gather everything you need. Running back and forth to the hardware store mid-project wastes time and breaks your momentum.
Here is what you need:
- Drop cloth or plastic sheeting – protects your floors from water and wet paper
- Painter’s tape – covers electrical outlets and keeps tape lines clean
- Wallpaper scoring tool – creates small holes so water soaks through
- Putty knife or scraper – loosens and peels the paper off the wall
- Pump sprayer or spray bottle – applies the wetting solution evenly
- Bucket and sponge – for wiping down walls after removal
- Wallpaper remover solution – store-bought or DIY
- Fine-grit sandpaper (220-grit) – smooths the wall after removal
- Wall primer – essential before painting on bare walls
- Gloves and safety goggles – for your protection
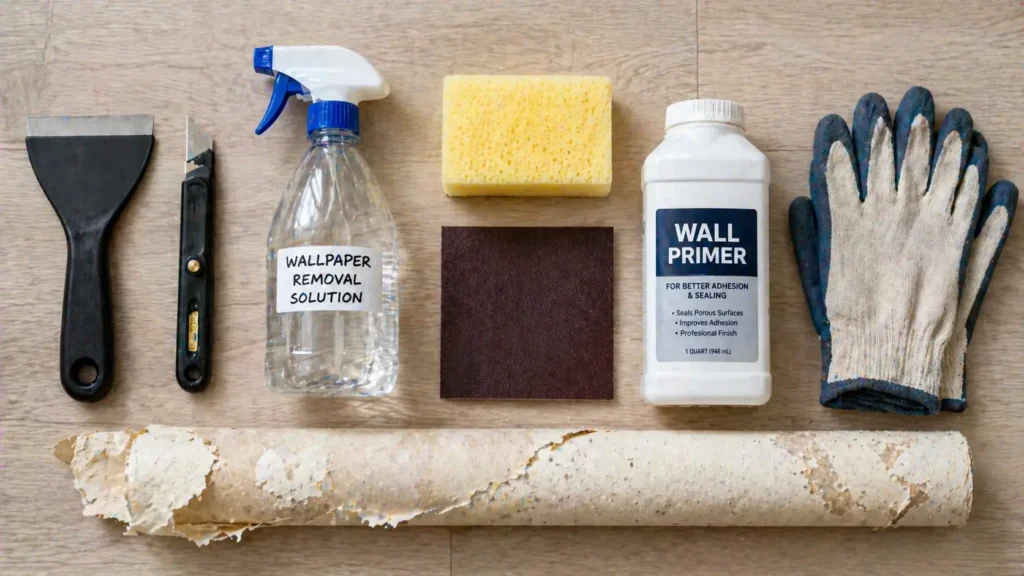
Having everything ready before you begin makes the whole job run faster and cleaner.
Step 1: Prep Your Space Properly
Good prep is the foundation of a smooth wallpaper removal job. Skip this step and you will regret it.
Start by moving all furniture away from the walls. Give yourself plenty of open floor space to move around freely. Remove everything that is hanging on the walls – pictures, mirrors, clocks, and shelves.
Next, switch off the electricity to any outlets on the walls you are working on. Then remove the outlet covers and use painter’s tape to cover each outlet and light switch. This keeps water away from electrical areas and prevents any safety hazards.
Finally, lay a drop cloth or plastic sheet along the base of every wall you plan to strip. Wet wallpaper is heavy and sticky – it will fall in large, soggy chunks. Protecting your floor now saves a big cleanup later.
Step 2: Check What Type of Wallpaper You Have
Not all wallpaper is the same, and knowing what type you are dealing with changes your entire approach.
Try this quick test first: Find a loose corner or edge of the wallpaper and gently pull it. If it peels away cleanly and in one piece – great news, you have strippable or peel-and-stick wallpaper. This type comes off with very little effort and almost no tools.
If the paper tears, shreds, or leaves a paper backing stuck to the wall, you are dealing with traditional wallpaper that needs soaking and scraping. This is the most common type found in older homes and requires more time and effort.
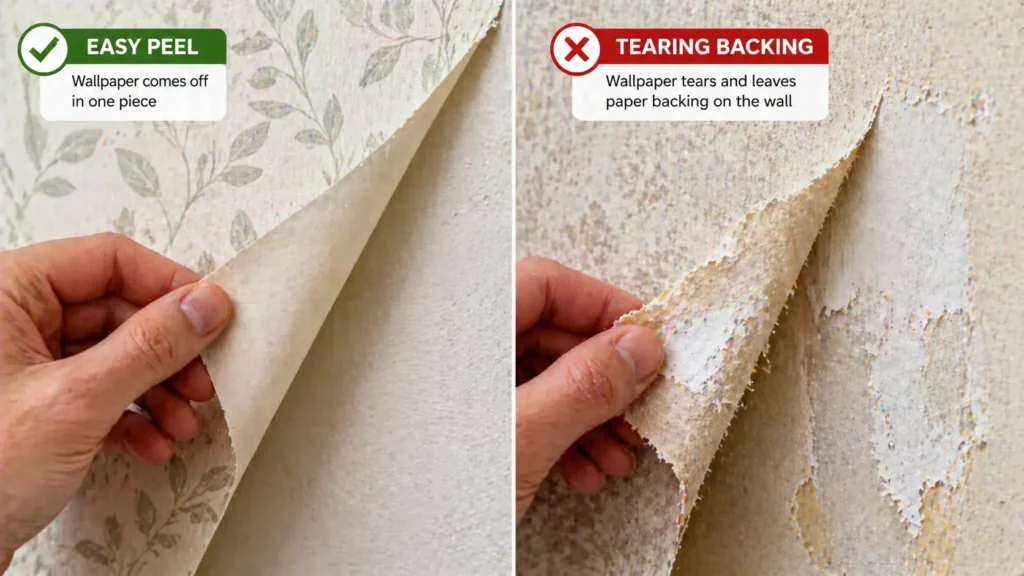
Some walls also have two layers of wallpaper – a top decorative layer and a paper backing underneath. You may need to treat these as two separate removal jobs.
Understanding which type you have before you start saves you time, effort, and frustration.
Step 3: Score the Wallpaper
If your wallpaper does not peel away easily, your next step is scoring it. A scoring tool (sometimes called a wallpaper perforator) rolls across the surface and pokes tiny holes into the paper. These holes let water or removal solution soak through the paper and reach the glue underneath.
Run the scoring tool gently across the entire wall surface in overlapping circular motions. Do not press too hard – you only want to pierce the paper, not gouge into the drywall behind it. Heavy pressure can damage the wall and create more repair work for you later.
Once the wall is fully scored, you are ready to apply your soaking solution.
Step 4: Choose Your Wallpaper Removal Method
This is where the real work begins. There are several effective methods for getting wallpaper off. Here are four that real homeowners have tested and used successfully:
Method 1: Store-Bought Wallpaper Remover Solution
Ready-made wallpaper remover sprays and gels are widely available at hardware stores. These products are designed to break down wallpaper adhesive quickly. Spray or apply the solution generously onto the scored wall, let it soak in for a few minutes, then start scraping.

This is one of the most reliable methods for stubborn or heavily glued wallpaper.
Method 2: Hot Water and Dish Soap
A simple mix of hot water and a few drops of dish soap works surprisingly well on many types of wallpaper. Fill a pump sprayer with the warm solution and spray it evenly across the wall. Let it sit for a few minutes to soak through, then use your scraper to lift the edges and peel the paper away.
Hot water softens the adhesive and makes the paper much easier to remove.
Method 3: DIY Fabric Softener and Water
Mix one part liquid fabric softener with two parts warm water in a spray bottle. This is a popular DIY solution that many homeowners swear by. The fabric softener helps loosen the glue while leaving a light, pleasant scent in the room. Apply it to the wall, wait a few minutes, then scrape.
Method 4: Clothes Steamer
A clothes steamer is one of the best tools for removing old, stubborn wallpaper – especially in homes built several decades ago. Hold the steamer plate flat against the wall for about 30 seconds at a time, then immediately scrape that section while the glue is still warm and soft.
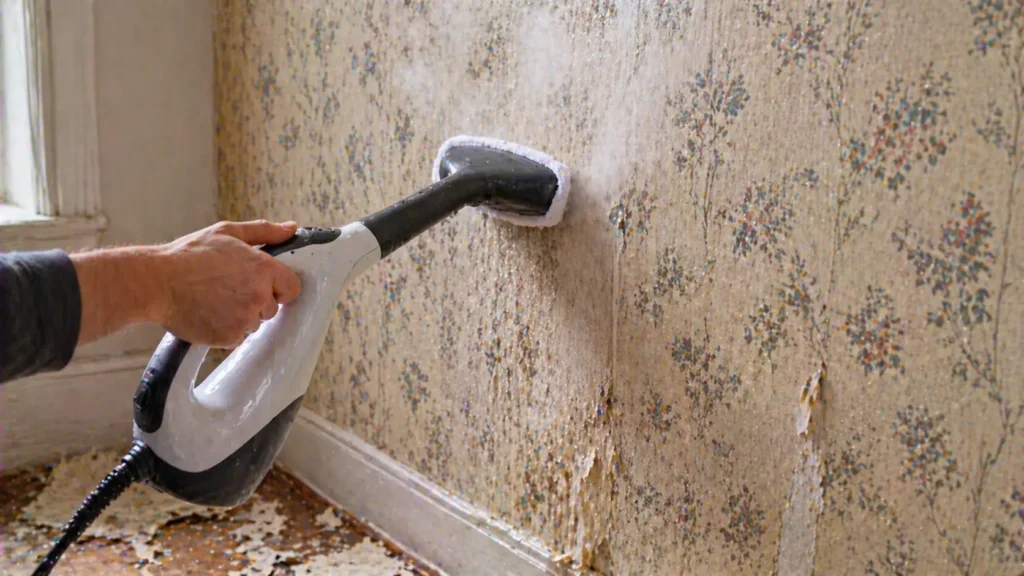
Steamers can be bought for under $60 and are worth every penny for tough jobs. The Handy Home Pro recommends this method for older homes where wallpaper has been sitting for many years.
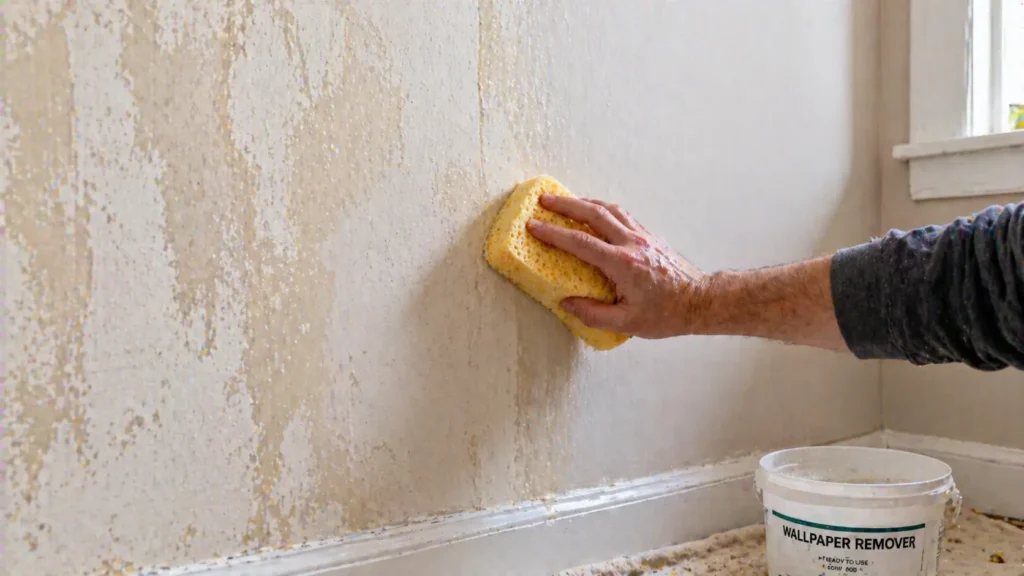
Step 5: Peel and Scrape the Wallpaper
Once your chosen solution has had time to soak in, it is time to start scraping.
Use your putty knife or wallpaper scraper to gently lift a corner or edge of the paper. Then peel it away slowly at a low angle – almost parallel to the wall. Pulling at a sharp upward angle increases the chance of tearing the paper into small pieces, which makes the job much harder.
Work in manageable sections. Spray, wait, then scrape – one section at a time. Do not let the solution dry on the wall before you scrape, or you will need to re-wet the area and start again.
As you go, drop the wet paper pieces directly onto your drop cloth so they stay contained and easy to clean up.
Step 6: Tackle Stubborn Adhesive and Backing
After the decorative paper layer comes off, you may find a thin paper backing still stuck to the wall, or patches of dried adhesive glue that refuse to budge. Do not skip this step – dried glue left on the wall causes major problems when you try to paint later.
Re-wet these stubborn areas with your soaking solution and let it sit longer than you did before – up to five minutes or more. Then scrape gently with your putty knife to lift the residue.
For the most stuck-on spots, a solution of warm water mixed with a small amount of white vinegar works very well at dissolving old adhesive without harming the wall surface underneath.
Take your time here. A clean, glue-free wall is the goal before you move on to repairs and painting.
Step 7: Repair and Prep the Wall for Painting
Once all the wallpaper and glue is gone, inspect your walls carefully. You will likely find small nicks, tears, or rough patches – especially on drywall, which absorbs moisture during the removal process.
Use a lightweight joint compound (also called spackling paste) to fill in any holes, dents, or torn sections. Let it dry fully, then sand the patched areas smooth using fine-grit sandpaper (220-grit works well).
Wipe the entire wall down with a damp cloth to remove any dust. Let the wall dry completely – ideally overnight.
Before painting, apply a quality wall primer. Priming is a step many people skip, but it is critical after wallpaper removal. Bare drywall soaks up paint unevenly, leading to a blotchy finish. Primer seals the surface and gives you a smooth, consistent base for your new paint color.
The Handy Home Pro always recommends using a stain-blocking primer after wallpaper removal – it prevents old glue stains from bleeding through your fresh coat of paint.
Tips for Making Wallpaper Removal Easier
Here are some extra tips that make the whole process go smoother:
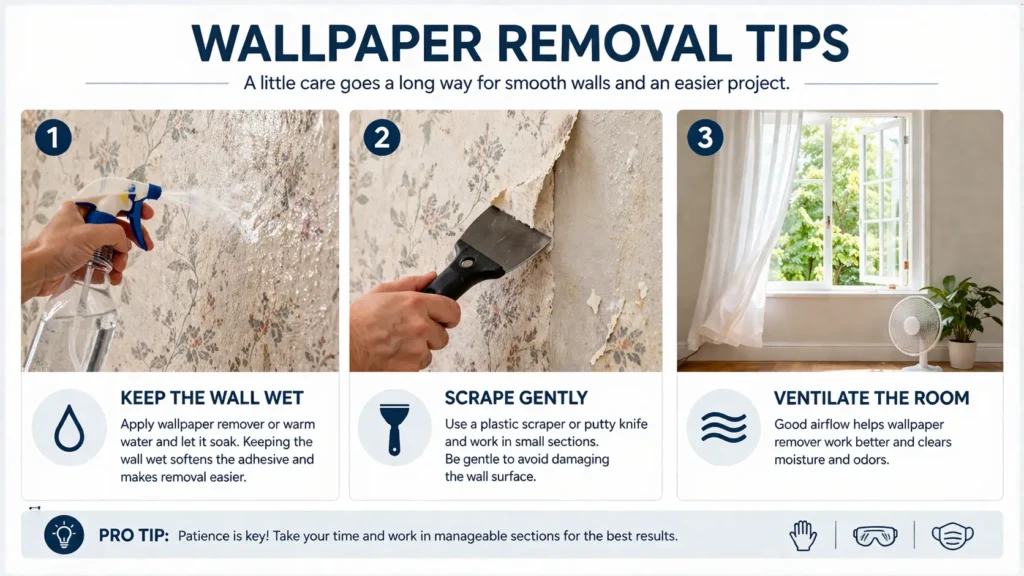
- Work from top to bottom. The solution you spray up high drips down, helping pre-soak the sections below.
- Keep the wall wet. If you let the solution dry before scraping, you have to start over. Work in small sections.
- Use a rounded putty knife. Sharp edges can gouge drywall easily. A rounded or plastic scraper is much safer on fragile surfaces.
- Be patient with soaking time. Rushing leads to tearing. Give the solution enough time to break down the glue.
- Open windows for ventilation. Water and steam can build up moisture in the room. Good airflow keeps things comfortable and helps the walls dry faster after removal.
How Long Does Wallpaper Removal Take?
A standard 12 x 12 foot room typically takes one to two full working days to complete – including removal, wall repair, and priming. Larger rooms, multiple layers of wallpaper, or heavily textured surfaces can take longer.
Budget your time realistically. Rushing this process leads to wall damage and a messier final result.
When Should You Call a Professional?
Most homeowners can handle wallpaper removal on their own with this guide. But there are times when calling in a professional makes more sense:
- Your walls have multiple layers of very old wallpaper (three or more layers)
- You discover mold or water damage behind the paper
- Your walls are heavily damaged and need significant repair work
- The wallpaper is applied directly over bare plaster without a primer layer
In these cases, a professional can save you time, prevent further damage, and ensure a clean result. The Handy Home Pro recommends getting a professional quote if you are unsure about the condition of your walls before starting.
Final Thoughts
Wallpaper removal is a project that rewards patience and preparation. It is not the fastest DIY job, but it is absolutely one you can do yourself with the right tools, the right method, and a solid plan.
Start by testing your wallpaper type, pick a removal method that suits your situation, work in small sections, and give your walls proper time to dry before you move on to repairs and painting. Follow the steps in this guide and you will finish with clean, smooth walls that are ready for a fresh new look.
Take your time, enjoy the process, and transform your space one wall at a time.
Frequently Asked Questions (FAQs)
The fastest method is using a clothes steamer combined with a good wallpaper scraper. The steam softens old glue almost instantly, making large sections come off in one clean pull.
It is not recommended. Paint over wallpaper often causes the paper to bubble, peel, and separate from the wall. It also traps moisture, which can lead to mold. Always remove wallpaper before painting.
A mix of one part white vinegar and one part warm water is a popular and effective DIY option. Fabric softener mixed with warm water is another well-loved solution among DIYers.
Pull gently at a corner. If it lifts away cleanly without tearing, it is strippable. If it shreds or leaves backing on the wall, you will need to wet and scrape it.
It can, especially if the original installer did not prime the drywall before hanging the paper. Using too much water or scraping too aggressively makes this worse. Work slowly and carefully, and plan for some minor patching and repair.
Yes, always. Priming seals the bare wall, covers glue residue stains, and gives paint something solid to grip. Skipping primer usually results in a patchy, uneven paint finish.