Installing a shower can seem like a daunting task – but it doesn’t have to be. Thousands of homeowners in the UK fit their own showers every year without hiring a plumber. With the right plan, the right tools and a clear step-by-step method, fitting a shower can be done by yourself in a weekend.
This guide covers everything – from choosing the right type of shower, to tiling, waterproofing and finishing. Whether you’re fitting a shower over a bath, installing a walk-in unit from scratch, or upgrading an old mixer valve to something more modern, this is where you’ll need to start.
Let’s get started.
What Type Of Shower Should You Choose?
Before you buy anything or choose any equipment, you need to choose the right type of shower for your home. Not every shower works with every plumbing system, and choosing the wrong type can make the whole job much more difficult.
Here is a quick breakdown of the most common options:
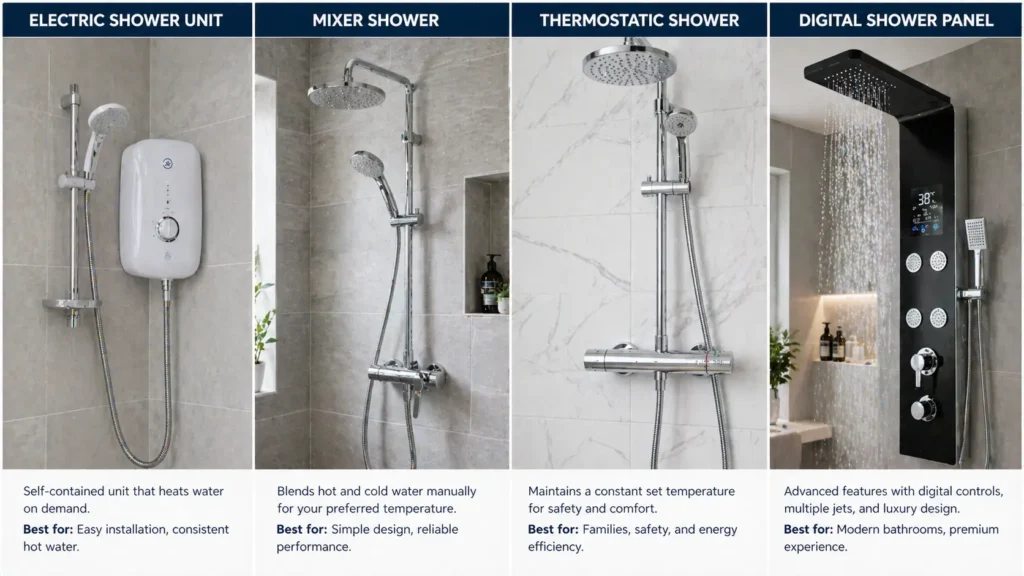
- Electric showers only require a cold water supply and heat the water themselves. They work independently of your boiler, making them ideal for homes with low water pressure or older systems. The downside is that they require a qualified electrician to wire them safely.
- Mixer showers uses your existing boiler to mix hot and cold water together. They provide a strong, steady flow and are suitable for homes with good water pressure systems. They look great and can be fitted with or without a visible unit on the wall.
- Thermostatic showers keeps the water temperature constant, even when someone flushes the toilet or turns on a tap elsewhere in the house. This is a smart choice for families with young children or elderly members, as they prevent sudden scalding or cold shock.
- Power showers includes a built-in pump to increase the water pressure. They look luxurious but use more water and energy, and cannot be used with a combi boiler.
- Digital showers are the most advanced option. They allow you to set a specific temperature, control the shower remotely and even save individual settings for each family member. They are more expensive and must be professionally installed.
Taking a moment to assess your home’s plumbing system and water pressure before you buy will save you a lot of time and money.
What To Consider Before You Start Fitting A Shower
The most important part of any shower installation is planning. Rushing without thinking ahead will lead to leaks, wasted materials and expensive repairs.
- Check your space carefully. Take measurements of the bathroom floor, walls and the area where the shower will sit. You need to know the exact dimensions before ordering a tray, enclosure or panel. This is especially important if you are planning to install a walk-in shower or replace a bathtub – you want to take advantage of existing plumbing connections where possible.
- Plan your plumbing and drainage. Adding a new shower means new water connections. Check that your current system can handle the extra demand. In some cases, you may need to extend or re-route pipes.
- Think about waterproofing from the beginning. This is a step that many DIYers skip, and it can cause serious damage later. The walls and floor around the shower area should be properly protected against moisture before tiling or panelling begins.
- Know the building regulations. In the UK, adding a shower to a bathroom does not usually require planning permission. However, any electrical work complies with Part P of the Building Regulations, and ventilation complies with Part F. If your bathroom doesn’t already have an extractor fan, you may need to add one.
Check Also: Different Types Of Window Blinds: Home, Office & More
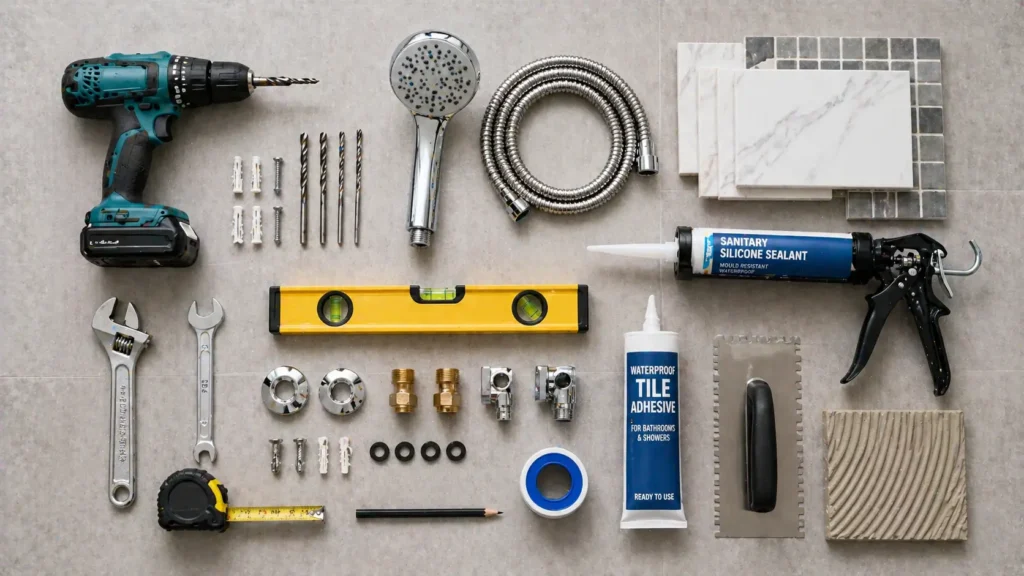
Tools And Materials You Need
Having everything ready before you start means there will be fewer interruptions when you get started. For a typical shower installation you will need:
- Adjustable spanner or pipe wrench
- Screwdriver set (flathead and cross-head)
- Power drill with masonry and tile bits
- Spirit level
- Tape measure and pencil
- Utility knife or fine-tooth saw
- Silicone sealant and sealant gun
- Wall plugs and fixings
- Waterproofing membrane or tanking kit
- Tile adhesive and grout (if tiling)
- Panel adhesive (if using shower panels)
- Trim pieces and edge profiles
Always read the instructions that come with your specific shower unit before starting. Different brands have different requirements, and following the manufacturer’s guidelines will protect your warranty.
Step-By-Step: How To Fit A Shower Over A Bath
Adding a shower to an existing bathtub is one of the most popular home improvements in the UK. It is quicker than installing a full shower and uses the plumbing already in place.
- Step 1 – Turn off the water supply.Find the stopcock (usually under the sink or near the water meter) and turn it off. Open the bathtub taps to drain any remaining water in the pipes.
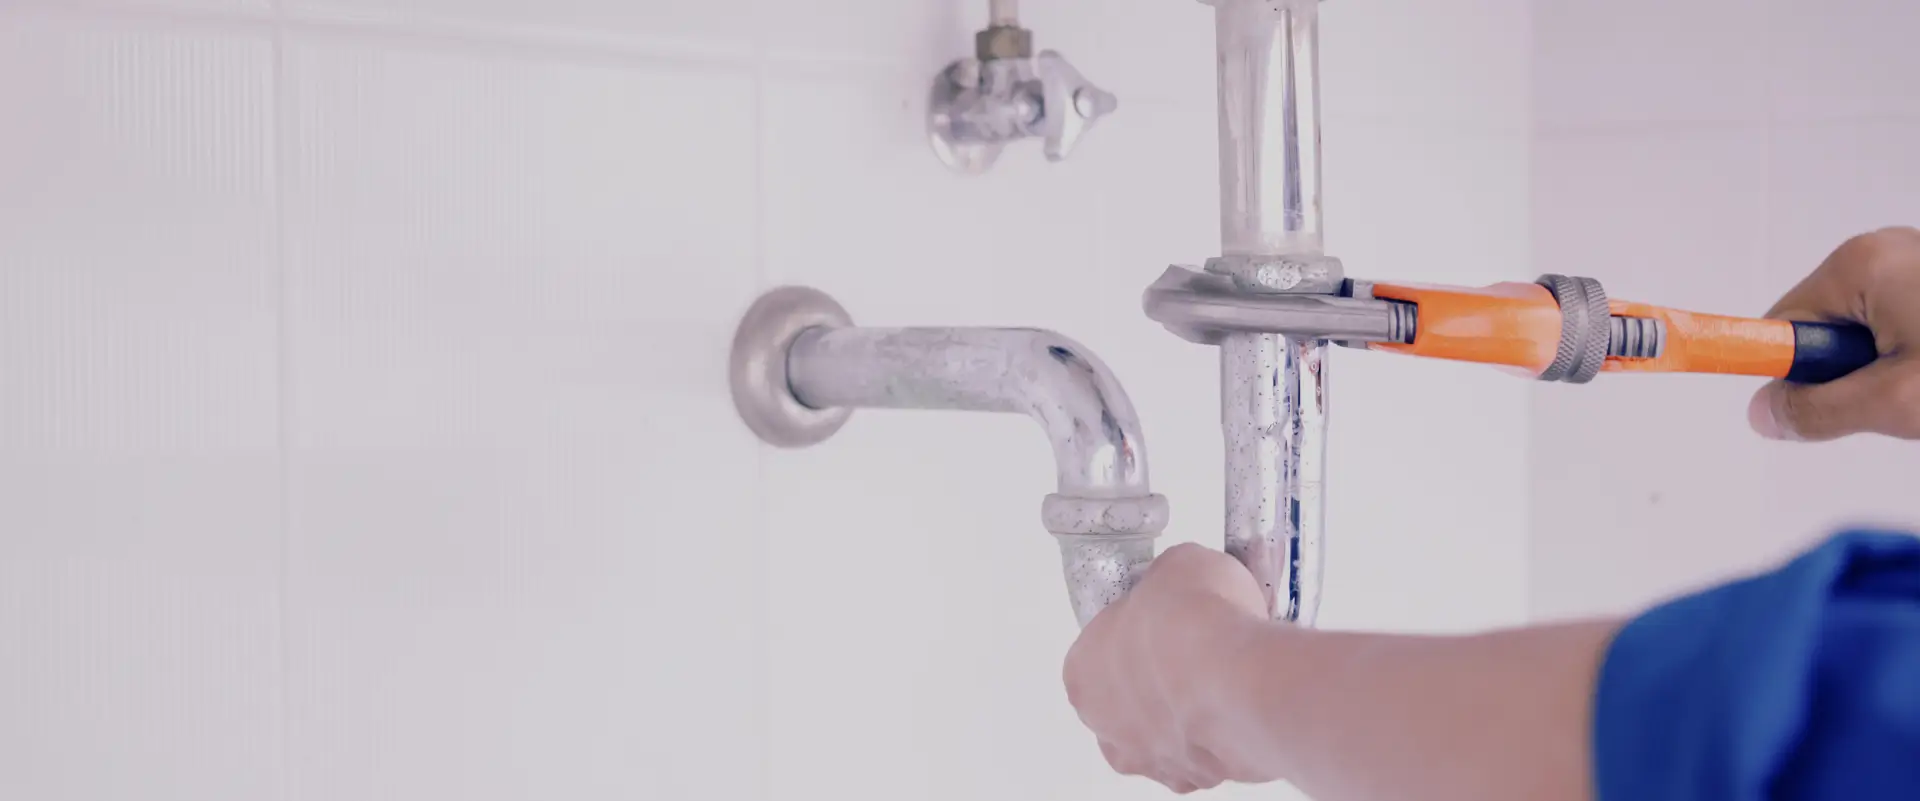
- Step 2 – Remove the old taps. Use your spanner to loosen the nuts under the bathtub that hold the existing tap in place. Carefully disconnect the hot and cold supply pipes and remove the old tap.
- Step 3 – Fit the new bath shower mixer tap. Place the new tap over the bathtub, making sure the washers are seated correctly for a watertight seal. Reconnect the hot and cold pipes and tighten firmly – but do not overtighten, as this can damage the fittings.
- Step 4 – Connect the shower hose and head. Attach the shower hose to the outlet on the mixer tap. Mark the position of the shower head holder on the wall – the ideal height is a few centimetres above the tallest person using the shower. Drill, insert the wall plug and screw the holder into place.
- Step 5 – Install a shower screen or curtain. A curtain rail is the easiest option and takes around 30 minutes to fit. A shower screen gives a more permanent, waterproof result. To fit the screen, measure and mark the position of the wall profile, drill and fix it in place, slide in the screen panel, and seal all edges with silicone where the screen meets the wall and bath rim.
- Step 6 – Turn the water back on. Slowly open the stopcock and check each connection for leaks. Test the mixer by running water from both the bath spout and the shower head.
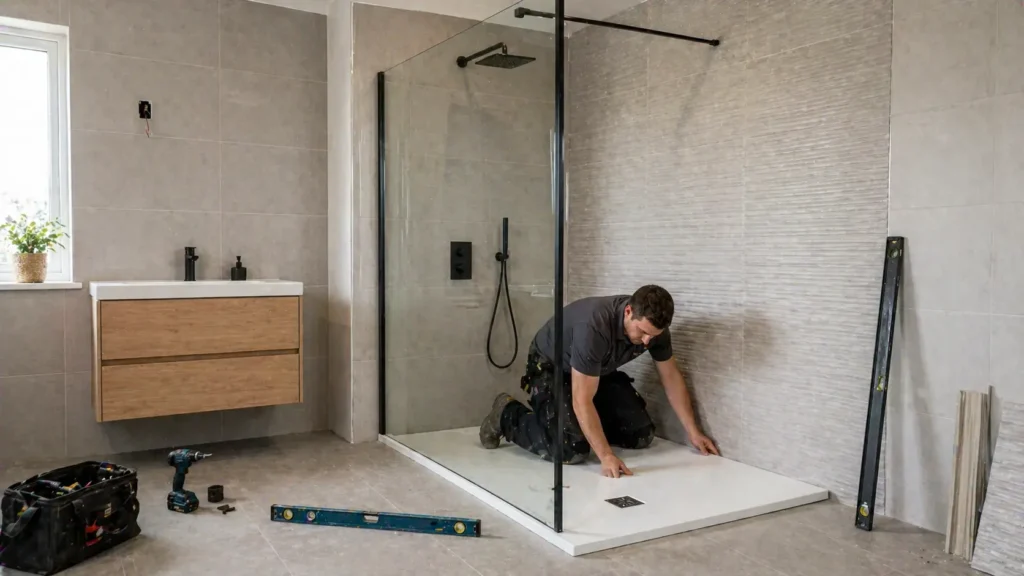
Installing A Walk-In Shower From Scratch
A walk-in shower creates a clean, open look and makes a bathroom feel larger. Installing one yourself is more involved than fitting a shower over the bath, but with careful planning it is very achievable.
- Decide on location and take accurate measurements. Choose where the walk-in shower will sit and carefully measure the total area – the floor, walls and how much space the enclosure will take up. If you are removing a bathtub to make room, first turn off the water supply and remove all existing fixtures. Once the old components are out, you can take full advantage of the plumbing already in the wall.
- Install the shower tray. The tray forms the base for the enclosure. Most standard trays sit directly on the floor, but some designs require small plinths or support feet. Follow the manufacturer’s instructions for your specific model. Once the tray is level and in position, connect the waste outlet to your existing drain.
- Fix the shower enclosure. Slide the enclosure walls or panels into place around the tray. Use a spirit level at each stage to make sure everything is sitting straight. Clip or screw the panels to the wall according to the product instructions, and check that all joints align cleanly before moving on to the sealing.
- Seal every edge with silicone. Apply a clean, even bead of silicone sealant to each joint – where the tray meets the wall, where the panels meet each other, and around any fixtures that pass through the wall. Allow at least 24 hours for the sealant to fully cure before using the shower.
Fitting A Concealed Shower: What You Need To Know
A concealed shower valve gives a bathroom a sleek, minimalist look where almost nothing is visible on the wall surface. The pipes and valves sit behind the wall, with only the controls and shower outlet visible on the surface.
This style of shower works best when the valve goes into a stud wall rather than a solid brick wall, as the valve body needs space behind the finished surface – usually 75 to 100mm deep. When building a stud wall from scratch, use 4×2 inch timber and fix a piece of 18mm plywood to the back so that the valve can be screwed securely.
A key tip for getting this right: use a laser level to make sure the fixed shower head sits in a perfectly straight vertical line above the valve. When tiling, the grout line runs through the center of both fittings, so any horizontal offset becomes very visible and looks unprofessional.
Once the valve and pipework have been tested and confirmed to be leak-free, mount the wall, waterproof it, and tile over the tile. Finally, a decorative cover plate slides over the valve body for a neat, finished result.
Also Read: How to Repair Hairline Cracks on Ceiling? (Guide 2026)
Tiling Vs Shower Panels: Which Finish Works Best?
Once the plumbing and enclosure are in place, you need to choose how to finish the walls inside the shower. The two main options are tiles and shower panels, and each has real advantages.
- Traditional tiling offers a premium, custom look and adds value to a home. When done properly, it is durable and long-lasting. The disadvantages are that it takes longer, costs more in materials and labor, and requires constant maintenance to prevent mold and discoloration of the grout lines.
- Shower panels are a quick, low-maintenance option. They fit directly onto the wall using panel adhesive, require no grouting, and are very quick to install. They suit DIYers of all skill levels because the process is straightforward – clean the wall, cut the panels to size with a utility knife or fine-tooth saw, apply adhesive, press firmly into position, and seal the edges and join with silicone. Trim profiles cover the edges for a clean finish.
At The Handy Home Pro, we’re seeing more and more homeowners opting for shower panels in 2026 – not only for the ease of installation, but the range of designs now rivals traditional tiles in style and appearance.
If you’re tiling, always apply a waterproofing membrane to the wall before applying the adhesive. Use a drill bit suitable for tiles (never standard masonry bits, which can crack the surface), and space the tiles evenly with plastic tile spacers before grouting.
Finishing Touches That Make All The Difference:
Once the shower is fitted and the walls are complete, a few finishing steps turn a functional installation into a polished result.
- Apply silicone sealant to every joint and edge. This is non-negotiable. Any gaps where water can creep behind the wall or under the tray can lead to dampness, mould and structural damage over time. Use bathroom-grade silicone and smooth it out for a clean line with a wet finger or sealant tool.
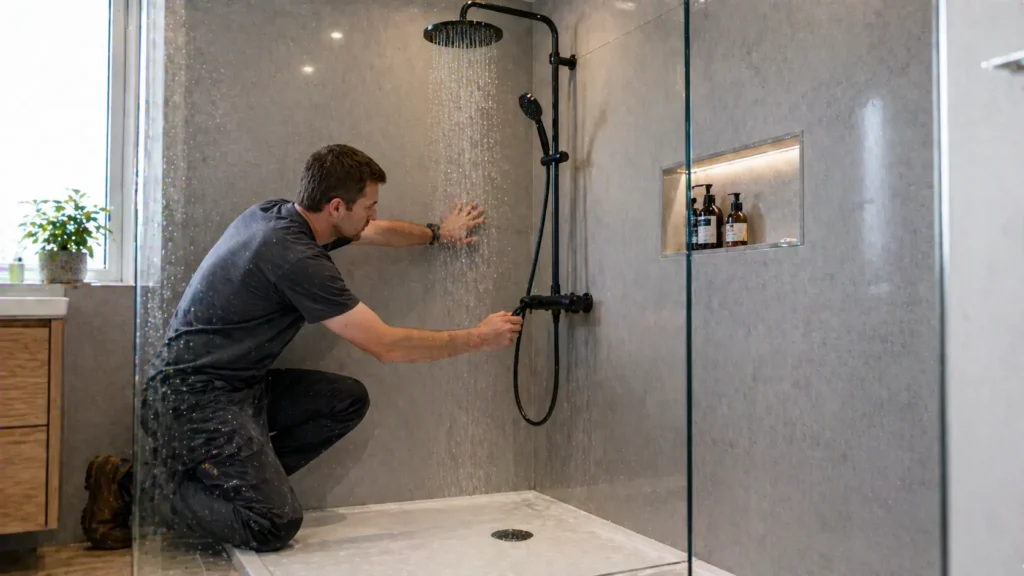
- Check for leaks before declaring the job done. Turn on the shower and let it run for five minutes. Look carefully at every joint, connection and edge. Fix anything that is leaking or leaking immediately – it’s now much easier to fix it after laying the floor or installing the panelling.
- Add good ventilation. A bathroom extractor fan is essential wherever a new shower is installed. Without it, moisture builds up quickly, causing mould to grow on the walls and ceiling. A fan that is activated automatically by a light switch is the most effective option.
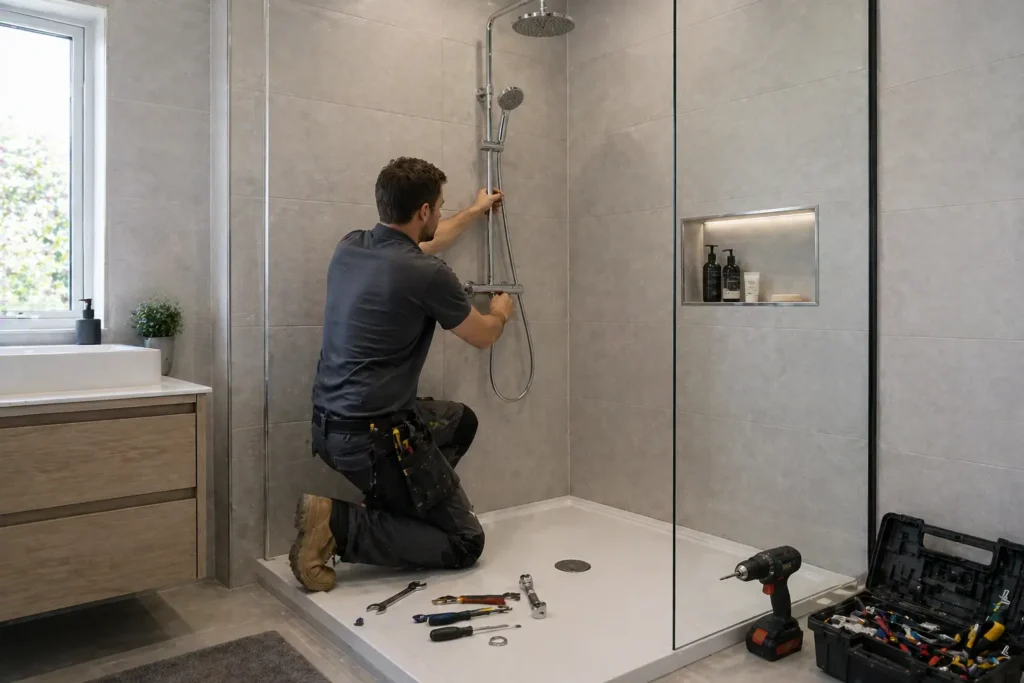
- Fit the final accessories. The shower head, slide rail, soap holder and riser rail all go last. Follow the product instructions for each fitting and use the correct fixings for your wall type.
Pro Tips For A Better Shower Installl:
These small details separate a good DIY finish from a professional one:
- Always dry-fit components before applying adhesive or sealant – it’s much easier to adjust before things are stuck in place
- Use a spirit level at every stage, not just at the start
- Buy a little more tile or panel material than you think you need – cutting mistakes happen, and having spare material avoids delays
- Silicone sealant has a limited shelf life once opened – use a fresh tube for the final seal
- If anything involves new electrical wiring, always call in a qualified electrician – this is not optional under UK building regulations
- Handy Home Pro recommends that at least 48 hours are allowed after the final seal before using the shower for the first time, allowing all adhesives and sealants maximum time to set.
Frequently Asked Questions:
Yes, in most cases. Fitting a mixer shower, bath shower tap or installing a shower enclosure and tray are all DIY-friendly tasks. The only exception is electrical work – any new circuit or electrical connection in a bathroom must be carried out by a qualified electrician under UK Part P regulations.
Fitting a shower directly above the bathroom usually takes one day. A full walk-in shower installation including tiling takes two to three days. A concealed valve with a full tiled finish takes longer and is dependent on the drying time for the waterproofing membrane and adhesive.
Turn on the tap in the bathroom and observe the flow. If it feels weak or uneven, your pressure may not be able to support a mixer or power shower. An electric shower is a better option in homes with low pressure, as it heats and delivers water independently of the mains pressure.
You don’t need planning permission for most shower installations. However, any new electrical work must be signed off under Part P regulations, and adequate bathroom ventilation is required under Part F. Always check with your local authority if you are unsure.
Apply a purpose-made tanking membrane or waterproofing liquid to all walls and floors of the shower area before tiling. For shower panels, the panels themselves act as a waterproof layer, but all edges and joints still need silicone sealant to prevent moisture from dripping in.
Standard plasterboard absorbs moisture and is not suitable for wet areas. You will need to use tile backer board or waterproof plasterboard and apply a waterproofing membrane before laying the tiles. Products such as The Handy Home Pro Tile Backer Board are specifically designed for this purpose and provide a stable, moisture-resistant surface.
This is a water pressure problem. A thermostatic shower valve provides the perfect solution to this – it automatically reacts to changes in pressure and maintains the water temperature you set regardless of what else is going on in the house.